Installation instructions
The software releases can be installed (the process is being referred to as flashing) to the internal memory of the PinePhone Pro (the eMMC) or to an microSD card.
Installation to the microSD card
The images can be installed to an microSD card and be booted from it.
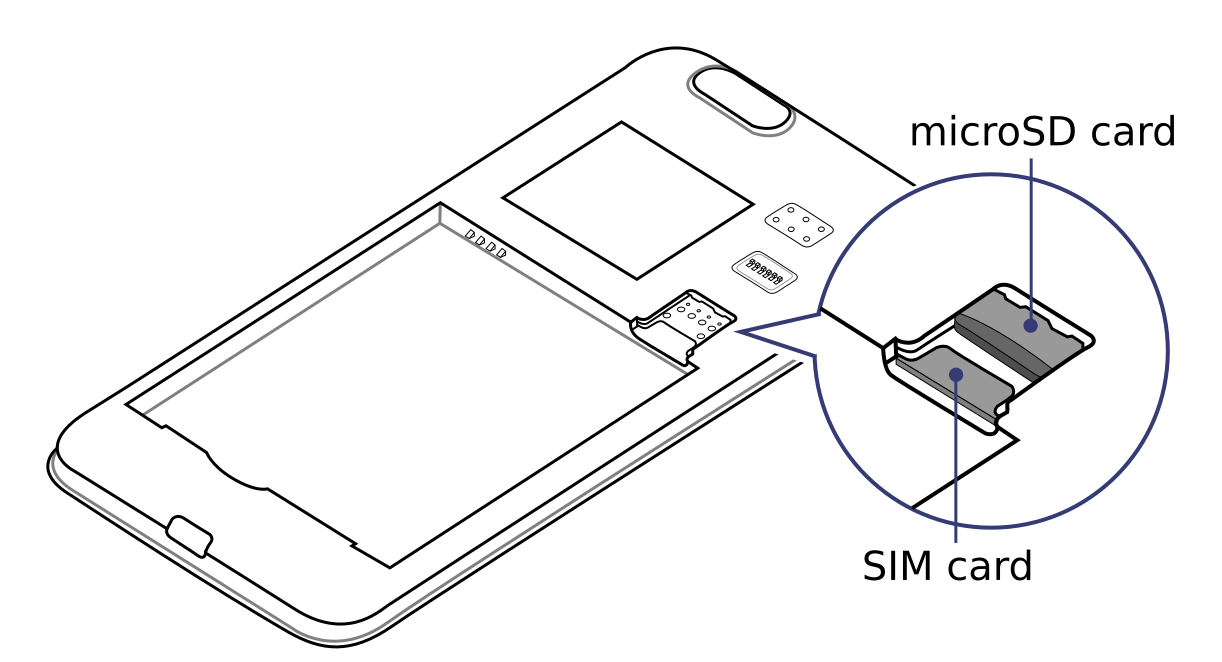
The microSD belongs in the upper slot, the SIM in the lower slot.
To install an image to the microSD card:
- Download a compatible image from Releases.
- Important: Typically the image will be compressed in an archive file to reduce the download size (such as .gz or .xz). Extract the image from its archive file to get the file with the file extension .img.
- Write the image to your microSD card using your favorite method, examples:
- Using dd: On the device you’re flashing the microSD card from, find the correct device under
lsblkand then flash the image to the microSD card usingsudo dd if=IMAGE.img of=/dev/[DEVICE] bs=1M status=progress conv=fsyncand make sure the target is the whole microSD card and not its first partition, sdc1 or mmcblk0p1 are wrong! - Using bmaptool: Make sure to select the correct device using
lsblk. Then run bmaptool with the correct device: Download the IMAGE.xz and the IMAGE.bmap files, then runbmaptool copy --bmap IMAGE.bmap IMAGE.xz /dev/[DEVICE]. This takes around 2.5 minutes to flash a 4 GB file. - Using a graphical tool: A graphical tool such as Gnome Disks under Linux or Etcher under Windows may also be used.
- Using dd: On the device you’re flashing the microSD card from, find the correct device under
- Insert the microSD card into the top slot of the PinePhone Pro
- Boot the device using the following method:
- With rk2aw (as on the Explorer Edition ordered after November 2023): boot the phone without any further action if the image includes a bootloader or one is installed to the eMMC (such as in the default installation).
- With Tow-Boot (as on the Explorer Edition ordered after July 2022): hold the volume down key while booting.
- With an empty SPI (like on the Explorer Edition ordered between January and July 2022): hold the RE button underneath the back cover while booting (or use the volume down key if you flashed Tow-Boot).
- On the Developer Edition (sold to selected developers only) there is no RE button. Instead apply the bypass by shorting the testing pads while booting according to the datasheet.
Installation to the eMMC
Installing an operating system to the eMMC (the internal memory of the PinePhone Pro) can either be done by booting an operating system from the microSD and by installing to the eMMC directly from the booted microSD card operating system (recommended) or by using Tow-Boot’s USB Mass Storage mode.
By booting a microSD card
The eMMC can be overwritten by booting an image from the microSD card and overwriting the eMMC from within that booted microSD card image.
This installation method is recommended.
- Boot an operating system from the microSD card. If there is already a bootloader on the eMMC installed see the section Boot order to bypass it.
- Download or copy the desired image to the microSD card as file
- Check if the eMMC appears under
lsblk. If it doesn’t appear in the output of the command, the eMMC wasn’t initialized due to applying the above explained bypass method for a too long time during the boot - Important: Typically the image will be compressed in an archive file to reduce the download size (such as .gz or .xz). Extract the image from its archive file to get the file with the file extension .img.
- Flash the image file using
sudo dd if=IMAGE.img of=/dev/mmcblk2 bs=1M status=progress conv=fsync(replace IMAGE.img with the filename of the image you want to flash and make sure it has the file extension .img). - Reboot the PinePhone Pro
By using Tow-Boot
The image can be written to the eMMC by using Tow-Boot’s USB Mass Storage mode.
This installation method is not recommended, as the USB connection can be unreliable and in some cases not work at all.
- Pre-requirement: Tow-Boot must be installed on the SPI, eMMC or the microSD card
- Power off the device
- Power on the device and hold the volume up key before and during the second vibration
- The LED will turn blue if done successfully. This will only work if Tow-Boot is installed
- When connecting the device to a computer via USB it will behave like an USB drive now
- Check if the eMMC appears under
lsblk, the output might look like the following:mmcblk2 179:0 0 115.2G 0 disk├─mmcblk2p1 179:1 0 122M 0 part /boot└─mmcblk2p2 179:2 0 115.1G 0 part /
Note: In this example, /dev/mmcblk2 is the device, while mmcblk2p1 and mmcblk2p2 are partitions of the device. The downloaded images are images from full devices, which means that the full device (mmcblk2 in this example) needs to be flashed. Ignore the partitions! - Important: Typically the image will be compressed in an archive file to reduce the download size (such as .gz or .xz). Extract the image from its archive file to get the file with the file extension .img
- Flash the image file using
sudo dd if=IMAGE.img of=/dev/DEVICE bs=1M status=progress conv=fsync(replace IMAGE.img with the filename of the image you want to flash and make sure it has the file extension .img and replace DEVICE with the correct device from the lsblk command) - Reboot the PinePhone Pro