PineTab2 (Single Page)

The PineTab2 with the detachable keyboard attached
The PineTab2 is PINE64’s successor to the original PineTab Linux tablet computer, featuring a faster processor and better availability. The tablet is available in two configurations, 4GB of RAM and 64GB of internal storage or 8GB of RAM and 128GB of internal storage. The tablet ships with a detachable keyboard that doubles as a protective cover.
The tablet is designed around the Rockchip RK3566 processor, which features 4 energy-efficient Cortex-A55 64-bit ARM cores and enjoys good mainline Linux support.
Pre-orders started on the 13th of April 2023, with pricing starting at USD 159 for the 4GB/64GB version and USD 209 for the 8GB/128GB version. The PineTab2 began shipping on June 2, 2023.
Getting started
The PineTab2 box contains two smaller boxes.
The first box includes:
- the PineTab2,
- a short user guide,
- a power cable and
- the UART adapter. Note that the UART adapter is in the same package as the power cable in a second compartment and can be a bit hidden.
The second box has the keyboard in it.
First start
The PineTab2 can be started by pressing and holding the power button for two seconds. The device is initialized at the first boot and will power-cycle while the partition table is populated.
The PineTab2 ships with DanctNix Arch Linux and comes with a pre-set user and the default password 123456.
| Default credentials | |
|---|---|
alarm | 123456 |
You can create a new user and set your own password after the initial boot. To do so, go to system settings -> users and create a new profile using your preferred name and password.
Keyboard cover
When connecting the keyboard to the Pinetab2 ensure that the camera and the golden pogo pin connectors are correctly aligned. The external keyboard has 5 connection pins (the golden pins). four are standard USB connectors and one is used to detect that the keyboard is connected.
The backlight can be changed with the key combination Pinekey + Ctrl (right).
Software
Installation instructions
The PineTab2 is capable of running different operating systems from the internal flash memory (eMMC) and from microSD card.
Preparing the microSD card
To write an operating system to the microSD card (typically called “flashing” in the community), you need to first download a compatible image from the Releases page.
Next you need to decompress the downloaded image. The images are typically compressed in an archive format such as xz to reduce the download size. If you are using a graphical tool such as balenaEtcher or Gnome Disks it will handle the decompression of the image in the flashing step automatically.
Further you need to flash the image to the microSD card. This can be done using various tools, for example balenaEtcher (recommended for new users), Gnome Disks or command-line tools such as cp and dd. Insert the microSD card in a microSD card reader connected to your computer and then choose a tool of your liking.
Graphical applications:
- balenaEtcher (Microsoft Windows, macOS, Linux): Click on Flash from file and select the image. Then select the microSD card target device and click on Flash!.
- Gnome Disks (Linux): Select the microSD card target device on the left side in the Disks list. Then select the three dot menu on the top right and click on Restore Disk Image…. Select the image, verify the correct device is selected and then click on Start Restoring….
Command-line tools:
cp:
sudo cp IMAGE.img /dev/[DEVICE]
dd:
sudo dd if=IMAGE.img of=/dev/[DEVICE] bs=1M status=progress conv=fsync
lsblk to find the device name. Make sure to flash to the whole device instead of partition 1 and that you’re NOT selecting /dev/sda1 or /dev/mmcblk0p1 as target. Be very careful to select the correct device, as the tools can overwrite your data when the wrong device is selected.Then insert the microSD card into the PineTab2.
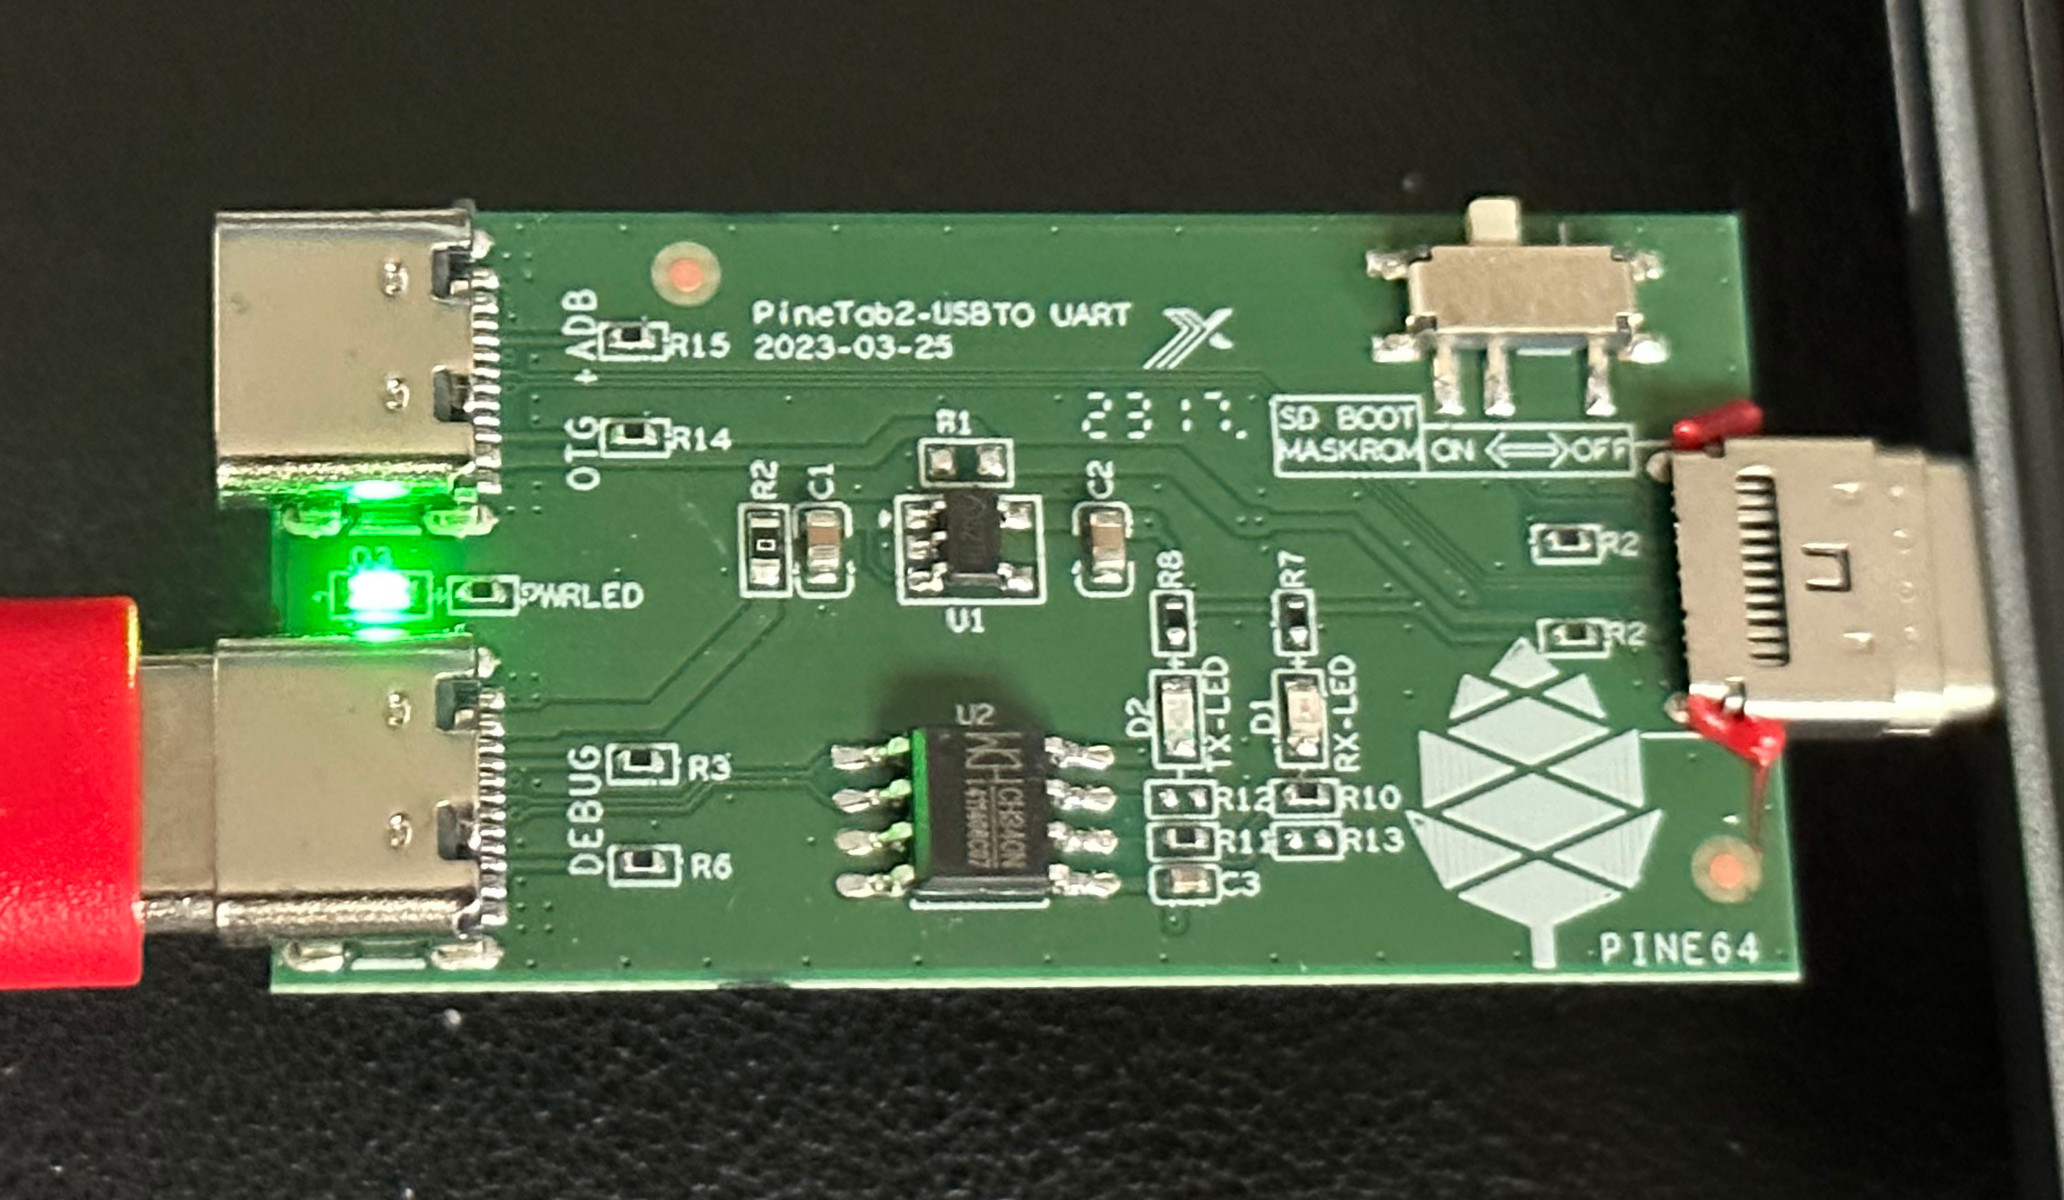
The UART adapter
Using the USB UART adapter can be required in some cases as explained in the info box about the boot order. The adapter is shipped with the PineTab2 in the box which is also containing the charging cable. The switch to disable the eMMC and SPI is located on the top right of the image.
Note regarding the boot order: The SPI and the internal memory (eMMC) have a higher boot priority than the microSD card. The pre-installed bootloader on the internal memory (eMMC) tries to boot from the microSD card first. In some cases it can be required to bypass the bootloader, for example if the bootloader is corrupted or was overwritten by a bootloader with varying settings.
To force the device to boot from the microSD card, the eMMC and the SPI can be disabled by using the debug UART adapter shipped with the device in the box also containing the charging cable. Set the SD BOOT MASKROM switch on the adapter to the position ON and plug it into the USB/PD charging port. Then power on the tablet and unplug the debug board or set the switch to the position OFF again when the factory image is started, otherwise the factory image won’t find the eMMC.
Power on the device with the microSD card inserted (and optionally with the USB UART adapter inserted and the bypass switch set to ON depending on the software situation, see the info box above). It should now boot the new operating system from the microSD card.
Something is not working? Please join the PineTab channel in the community chat, the community is always happy to help. In the page UART adapter you can find information about how to connect the USB UART adapter and how to retrieve the boot logs if the device is not booting properly even after the above procudere.
Releases
This page contains a list of all available releases and tools for the PineTab2 in alphabetical order.
Factory releases
The PineTab2 ships with Danctnix Arch Linux ARM. The latest factory image can be found here:
- https://echo.danctnix.org:7269/factory_images/pinetab2/ (choose the latest)
Linux
Arch Linux ARM
(Unofficial) Arch Linux ARM maintained by the DanctNIX community (GitHub: danctnix, dreemurrs-embedded).
Download
- SD-card boot: https://github.com/dreemurrs-embedded/Pine64-Arch/releases
- Factory flash image: https://echo.danctnix.org:7269/factory_images/pinetab2/
| Default credentials | |
|---|---|
alarm | 123456 |
Notes
- Currently ships without Bluetooth driver, and Wifi driver is unstable.
- Shutdown / Reboot sometimes hangs (but not always), this is caused by the Wifi driver.
Buildroot
Buildroot is a simple, efficient and easy-to-use tool to generate embedded Linux systems through cross-compilation.
An external tree for the PINE64 PineTab2 is developed and maintained by Danct12 (same developer behind the PineTab2 port of Arch Linux ARM).
Download
- The repository and build instructions can be found here.
Fedora Workstation
Fedora Workstation is a polished, user-friendly Linux distribution maintained by the Fedora community.
Download
The Fedora Workstation aarch64 raw.xz image boots normally without requiring additional configuration after being written to an SD card.
Notes
- Currently ships without Bluetooth driver.
- Wifi driver would need manual compilation.
LuneOS
LuneOS is one of the original multi-tasking OS-es that runs on Linux. Based on HP/Palm’s webOS, merged with latest technology stack from LG called webOS OSE (a derivative of what LG uses on their Smart TV’s), software such as Qt6, Maliit, PulseAudio, Wayland and makes use of the Yocto build system.
Download
Stable: https://github.com/webOS-ports/luneos-releases/releases/
Testing: https://github.com/webOS-ports/luneos-testing/releases/
| Default credentials | |
|---|---|
root | no password |
Notes
- The development is work in progress, but all hardware that’s supported by the kernel should work (WiFi/BT included). Camera’s aren’t working, similar to all other distros due to lack of drivers.
- In order to connect to the device using SSH/SCP, you simply can connect to the device’s IP address on port 5522.
- Teams can be reached via Telegram or Libera IRC #webos-ports
Mobian
An unofficial Debian build for ARM64 running with Phosh. The current version of the base Debian system is Debian Bookworm. See the installation instructions here. If you have questions about Mobian, please ask them in the Mobian Matrix room.
Download
| Default credentials | |
|---|---|
mobian | 1234 |
Notes
- The development is work in progress. Mobian’s support for the PineTab2 is maintained by Julian. The Mobian wiki can be found here.
- In order to connect to the device using SSH/SCP, you need to install SSH on the device. You can do this by executing the following in a shell: “sudo apt-get install ssh”, afterwards you can connect via SSH/SCP using the PineTab2’s IP address on port 22.
- When installing Mobian with full disk encryption and booting with the keyboard case connected, you will have to touch the screen or press a key to show the decryption screen. This is an upstream issue.
NixOS
NixOS is an immutable Linux distribution built around the Nix configuration language. The NixOS image for PineTab2 uses some downstream modifications to packages, such as an U-Boot package based on 2024.04 and the kernel also used by the Arch Linux Arm image.
Download
Notes
Note that booting can take a while, and does not show anything on the screen. After about 18 seconds the keyboard backlight turns on, then it’s about 30 seconds until the first text appears on the screen, and another 10 seconds before the session manager shows up.
| Default credentials | |
|---|---|
pinetab2 | changeme |
Plasma Mobile on Debian
Images of Plasma Mobile on either Debian Bookworm or Debian Trixie created by dieselnutjob
The images include uboot, and are an SDcard installer (modified from the Danctnix OS Factory Tool). Using the installer wipes the eMMC drive.
Download
https://sourceforge.net/projects/pinetab2debianplasmamobile/files/
| Default credentials | |
|---|---|
pt2 | 1234 |
root | 1234 |
Notes
The image will not autoexpand to the fill the eMMC, however once booted it is easy to adjust the size of the rootfs using the included KDE Partition Manager.
The PineTab2 may be reluctant to shutdown, with several minutes delay whilst the BES2600 wifi driver unloads. This can be avoided by turning off the wifi in the menu that can be pulled down from the top of the screen before shutting down or rebooting.
There is a video of the PineTab2 running one of these images here https://www.youtube.com/watch?v=9xpSuG63Rck
The author may be contacted via the pinetab discord channel on the Pine64 discord.
postmarketOS
postmarketOS extends Alpine Linux to run on smartphones and other mobile devices.
It offers various user interfaces (Phosh, Plasma Mobile, Sxmo, Plasma Desktop, Gnome 3, Kodi, XFCE4 and more). As of writing, this distro is currently in testing and no official releases are available for download. Instead, users will need to create their own image with the distribution’s install and development tool pmbootstrap.
Download
- Pinetab2 Device Page
- Build the image with pmbootstrap and flash it to an SD.
Rhino Linux
Rhino Linux is an Ubuntu-based distribution that uses the rolling-release model by tracking the devel branch of repositories. The port is currently maintained by Oren Klopfer (oklopfer).
The bootloader (u-boot) comes pre-flashed in the port. Installation just requires flashing the .img.xz to an SD or the eMMC.
Download
Rhino Linux Downloads (select Pine64 on the dropdown)
| Default credentials | |
|---|---|
rhino | 1234 |
Notes
Foundational to the distribution is Pacstall, a Debian-based user repository inspired by the AUR. Additionally, RL comes with Unicorn, a custom modified version of XFCE with various modernizations and improvements, including auto-rotation for mobile devices.
Discord - Matrix - GitHub - Wiki
Ubuntu Touch
A Mobile Version of the Ubuntu Operating System made and maintained by the UBports Community. The port is currently maintained by Oren Klopfer (oklopfer).
The bootloader (u-boot) comes pre-flashed in the port. Installation just requires flashing the .img.xz to an SD or the eMMC.
Download
UBports 20.04 PineTab2 Latest Releases
| Default credentials | |
|---|---|
| Default user | Set during boot |
| root | phablet/1234 |
Notes
Scroll down to the middle of the GitLab project page, or directly here at the UBports website to see which features work.
Contributions and bug reports can be made at the UBports PineTab2 GitLab page. See UBports website for how to donate.
Void Linux
Void is a general purpose operating system, based on the monolithic Linux kernel. Its package system allows you to quickly install, update and remove software. The port is currently maintained by Sinisha Stojchevski (sini6a).
The bootloader (u-boot) comes pre-flashed in the port. Installation just requires flashing the .img.xz to an SD or the eMMC.
Download
| User | Password |
|---|---|
| root | voidlinux |
Notes
To enable graphics driver make sure to install mesa-panfrost-dri.
Contributions and bug reports can be made at the GitHub Project Page. See VoidLinux page for more information about the operating system.
Tutorials and FAQ
This is a collection of tutorials and frequently asked questions for the PineTab2.
Tutorials
Putting the Device into Maskrom Mode
To recover from a bad eMMC/SPI flash, plug the included debug adapter into the charging USB-C port and switch the white switch to its “ON” position to bypass eMMC/SPI boot. This tries to boot from SD, and if no SD is inserted, enters Maskrom mode.
Recovery from non-booting device
There may be situations where the device refuses to turn on and you cannot see anything coming up through UART. This may indicate that your device is bricked. The PineTab2 includes a debug adapter which allows the user to access Maskrom mode. On it’s own this mode is useless as the user requires a miniloader from Rockchip to access any rkdeveloptool commands.
Install rkdeveloptool
First you must install rkdeveloptool if you haven’t already. You can find instructions on the Rockchip wiki.
Clone
git clone https://github.com/rockchip-linux/rkdeveloptool.git
Install dependencies
sudo apt-get install libudev-dev libusb-1.0-0-dev dh-autoreconf pkg-config libusb-1.0
Compile
autoreconf -i
./configure
make
make install
Put device into Maskrom mode
The debug adapter, bottom port is for UART and the top one is for maskrom
Turn off your PineTab2 by holding the power button for around five seconds. Then grab your debug adapter, make sure the Maskrom switch is in the “ON” position, plug it into your PineTab2 and plug a USB-C cable into the top port and into your computer.
Check that your device is in Maskrom mode by typing lsusb into a terminal. If it displays Fuzhou Rockchip Electronics Company Device then it has successfully entered Maskrom mode.
Troubleshooting
- If you only see
QinHeng Electronics USB Serial(UART) either try switching USB-C ports on the adapter or plugging in both adapter ports into your computer.
Boot miniloader using Maskrom
To issue any commands using rkdeveloptool you must first load a Rockchip miniloader through Maskrom.
Download MiniLoaderAll.bin.zip
Once you download and unzip the miniloader, issue this command using rkdeveloptool.
rkdeveloptool db MiniLoaderAll.bin
rkdeveloptool commands you must follow the above instructions again.Once the command completes, wait for the device to reappear in lsusb. Make sure it has a different name than before. Be patient as it can take ~20 seconds.
Fuzhou Rockchip Electronics Company Device USB-MSC
Recovery to factory firmware
To make sure the only boot option for the device is via SD Card, erase the internal storage.
rkdeveloptool ef
You will have to wait for a while until it has finished. Once the command has completed, force power off the device and place an SD Card with the DanctNix factory firmware into the card slot.
Download factory image
https://echo.danctnix.org:7269/factory_images/pinetab2/
Screen Rotation
Auto-rotating the Screen
Auto-rotation is handled by your operating system. However, the following general steps should work on distributions that support iio-sensor-proxy:
- To enable auto-rotation, install the iio-sensor-proxy package:
sudo pacman -S iio-sensor-proxyand reboot. - Some desktop environments, such as KDE, default to only allowing screen rotation while in tablet mode (detached from the case.) To enable it with the keyboard attached, go to System Settings–>Display and Monitor -> Display Configuration -> Uncheck “Only when in tablet mode” and click “Apply.”
Rotating the Login Screen
Login screen orientation is handled by your operating system. Below are the instructions for the SDDM login screen that ships with the factory image:
By default, the login screen is set to display in portrait mode. If you wish to change it to landscape mode to match the keyboard while in the case, use the following steps (Credit to chzbacon) :
- Install necessary software:
sudo pacman -S xorg-xrandr xorg-xinput - Edit /usr/share/sddm/scripts/Xsetup. For example, using nano:
sudo nano /usr/share/sddm/scripts/Xsetupand add the following two lines to the end of file:xrandr --output DSI-1 --mode 800x1280 --rate 60.00 --rotate rightxinput set-prop "pointer:Goodix Capacitive TouchScreen" --type=float "Coordinate Transformation Matrix" 0 1 0 -1 0 1 0 0 1
- Now edit /etc/sddm.conf.d/sddm.conf, for example:
sudo nano /etc/sddm.conf.d/sddm.confand add the following two lines (case sensitive):[X11]DisplayCommand=/usr/share/sddm/scripts/Xsetup
- Reboot, and your login screen should now display in landscape mode.
Frequently Asked Questions
General
How does the PineTab2 compare to the Pinebook Pro?
It’s slower, as it is intended to be a successor to the PineTab1, not the Pinebook Pro. It’ll still handle web browsing, video playback and documents fine though.
What is the Performance of the PineTab2 compared to the PineTab-V?
The PineTab2 is notably faster than the PineTab-V. You can see this by comparing the Quartz64 sbc-bench results to the Star64 ones. Performance should not be a factor of consideration when purchasing a PineTab-V.
I am a casual user with minimal Linux experience. Is this device for me?
The PineTab 2 is considered early release at this point, and the community is expected to develop support for it over time. For example, the Known issues page details several features that are not yet fully working. You may at times need to troubleshoot this device and some development experience is ideal if you want to realize the tablet’s full potential at this stage.
For these reasons, the PineTab2 may not be the ideal device for casual users. However, if you feel up to the challenge and want to learn while joining a great community, you are more than welcome! Please join one of our chat platforms: the community is always happy to help!
What works, what doesn’t?
Please see Known issues.
I only know Python, can I help with drivers?
Drivers are (at least typically) written in the C programming language. Unfortunately, there is no way to “code drivers in Python” because usually drivers need to access and process memory allocation directly. If you feel like this is interesting to you, we suggest you to spend some time learning the C programming language, maybe with an emphasis in device driver development. The good news is that, since you already know a programming language, you already know part of the skill.
In short, you can only help with drivers development if you learn the C programming language first.
Hardware
Does the Tablet support a Pen?
No, adding a digitiser for pen inputs would make the price too high.
Is there SPI Flash?
Yes! A 128 Mbit flash chip (sk25lp128) is reportedly present on production devices.
Software
What operating systems are currently available?
The PineTab2 uses ARM operating systems. Please see Software for a current list of software releases.
How can I install an operating system on the SD card / eMMC?
See the article Software.
Can I run Android on it?
Theoretically yes, practically there’s little chance anyone wants to make a well-supported Android build for this device. If you’re looking for an Android tablet, buy any mainstream tablet, and you’ll get better value for your money.
However, if you just need to run a few simple android apps, you might want to have a look at Waydroid which can be installed on Arch Linux ARM using the following command: sudo pacman -S waydroid
Booting
What’s the boot order for SD cards and eMMC?
The SPI and the internal memory (eMMC) have a higher boot priority than the microSD card. Please see the Software for more detailed information.
Can I install a different OS on my PineTab2?
Yes! While all PineTab2 come with an OS preinstalled, you are free to use any OS on the integrated storage (the eMMC) or an SD card. See Software for how to install them.
Bluetooth
The Bluetooth isn’t working
The BES2600 Bluetooth driver still needs to be implemented. Please see the Networking Using USB section above for a workaround.
Wi-Fi
The Wi-Fi isn’t working
The BES2600 Wi-Fi driver needs major cleanup and bugfixing: at the moment it causes system crashes. Please see the Networking Using USB section for a workaround.
Video
Can PineTab2 play back DRM content such as Netflix?
Yes, though the specific implementation depends on your installed operating system.
On the default Arch Linux Arm: Widevine, using the widevine-aarch64 package in the AUR is working, and was demonstrated on the PineTab2 using Paramount+ and Disney+. Install it (yay -S widevine-aarch64), run the included register script to get Firefox to recognize it, and it should start working.
Development
See the related page Quartz64 development.
Linux mainline is already quite far along for the device, as the SoC is the same as is used in the Quartz64 line of devices. Some minor PineTab2-specific adjustments can be found here.
Known issues
Wi-Fi and Bluetooth
- The BES2600 Wi-Fi driver needs major cleanup and bugfixing (at the moment it often causes system crashes). This is a priority, but for now, you can USB tether a phone or use a supported WI-FI dongle. There are at least two code releases available, with two respective/non-interchangeable firmware versions. Kernel 6.9.2-danctnix1-1-pinetab2 has a somewhat working WiFi driver.
- The BES2600 Bluetooth driver needs to be implemented.
- Hardware bugs - the power and reset circuitry is not properly implemented in the circuitry, so hard reset of the chip (in the theoretical case it freezes) is impossible without power cycling the whole board.
Camera
- The camera drivers needs to be ported (gc02m2, ov5648), Rockchip CSI/ISP driver needs to be extended to handle 2 lanes.
Suspend
- Suspend does not currently work reliably due to a driver issue. It is therefore disabled in the factory image. Caveat Emptor if you chose to unmask the feature prior to it being fixed.
UART adapter
The UART adapter
The USB-C UART adapter can be connected to the PineTab2 to debug boot issues at the early boot:
- Plug the adapter face-up in the USB-C port furthest away from the power button. If all the lights are lit, you have the wrong port: only the green light should be lit when you first plug it in.
- Plug USB-C cable into the port on the adapter marked “DEBUG” (the other port can be used as a power delivery passthrough so you can charge and debug at the same time)
- Set the ‘SD BOOT MASKROM’ switch to OFF if no SD card is inserted and you do not plan to boot from an SD card. If the switch is set to ON without an SD card present, the tablet may fail to boot.
- Open a terminal window
- Install minicom or screen via your distribution’s package manager, if you don’t have it installed already
- Connect via minicom using
sudo minicom -D /dev/ttyUSB0 -b 1500000or via screen usingsudo screen /dev/ttyUSB0 1500000- Ubuntu-based distro users may encounter the error, “cannot open /dev/ttyUSB0: No such file or directory”. If this occurs, check the output of
sudo dmesg --followand unplug/replug the USB to look for any errors. If you see an error like, “usb 1-1: usbfs: interface 0 claimed by ch341 while ‘brltty’ sets config #1”, then the brltty service is likely conflicting with this device. Brltty provides access to blind users who use a braille display: if you do not need this service, try disabling it using these commands:sudo systemctl stop brltty-udev.servicesudo systemctl mask brltty-udev.servicesudo systemctl stop brltty.servicesudo systemctl mask brltty.service
- Ubuntu-based distro users may encounter the error, “cannot open /dev/ttyUSB0: No such file or directory”. If this occurs, check the output of
Further information
Certifications
PineTab2 certifications:
- PineTab2 FCC Certificate
- PineTab2 CE RED Certificate
- PineTab2 CE EMC Certificate
- PineTab2 ROHS Test Report
- PineTab2/PineTab-V Detached Keyboard CE EMMC Certificate
Datasheets
Rockchip RK3566 SoC information:
Disassembly guide
PineTab2 disassembly guide:
- File:PineTab2 display panel disassembly guide.pdf
- Note: this is a very delicate operation, especially around the corners of the screen. Several even experienced users damaged their screen when disassembling the device.
Schematics
PineTab2 mainboard Schematics:
- PineTab2 mainboard Released Schematic-20230417 ver 2.0
- PineTab2 PCB Component Reference location v2.0 (top layer)
- PineTab2 PCB Component Reference location v2.0 (bottom layer)
- PineTab2/PineTab-V UART Dongle Schematic-20221107
Specifications
- SoC: Rockchip RK3566
- CPU: 4x ARM Cortex-A55 @ 1.8 GHz
- 32KB L1 Instruction Cache and 32KB L1 Data Cache per core
- 512KB unified system L3 cache
- ARMv8 Cryptography Extensions
- GPU: Mali-G52 MP2 @ 800 MHz
- Supported by the open source ‘Panfrost’ driver in Linux and Mesa
- Supports OpenGL 3.1 and OpenGL ES 3.1 with many newer extensions
- NPU: 0.8 TOPS Neural Processing Unit
- RAM: 4GB or 8GB LPDDR4
- Storage:
- 64GB or 128GB internal eMMC (SiliconGo SGM8 100C-S36BCG; eMMC 5.1, up o 400MB/s)
- 1x MicroSD slot
- Display: 10.1" IPS LCD Resolution 1280x800
- Cameras:
- Front: 2Mpx, chipset: Galaxycore GC02M2
- Rear: 5Mpx, chipset: Omnivision OV5648
- Battery: 6000 mAh (22.2Wh)
- Buttons: Power, volume up, volume down
- Network:
- Wi-Fi: BES2600
- Driver under development, use a USB wifi dongle for now
- Bluetooth: BES2600
- Wi-Fi: BES2600
- I/O:
- 1x USB-C 3.0 (top, host mode only; power output up to 680mA)
- 1x USB-C 2.0 + PD (bottom, device mode by default; power input)
- 1x MicroHDMI
- 1x 4 pole 3.5mm audio jack (microphone right) and headphone detection
- 2x speakers + microphone (microphone left)
- 1x 5 pin (USB 2.0; <=680mA) Pogo connector for keyboard
- (PCIe on PCB as a flat flex ribbon connector, no room for M.2 NVMe drives in case)
- Sensors:
- Accelerometer: Silan SC7A20
- Ambient Light & Proximity Sensor
- Multimedia:
- rkdjpeg: 1080p120 JPEG decode
- hantro: JPEG/VP8/H.264 encode, 1080p MPEG-2/H.263/VP8/H.264 AVC decode
- rkvdec2: 4K H.264 AVC Main10 L5.1/H.265 HEVC Main10 L5.1/VP9 Profile 0 and 2 L5.1 decode
- rkvenc2: 4K H.264 AVC/H.265 HEVC encode
- Build: Metal and Plastic
- Dimensions: 242x161x9mm
- Weight: 538g
- Misc:
- Protective cover with keyboard